How to Take Big Suns in Photography
0 comments Published by blogster on Sunday, June 25, 2006 at 3:34 AMSure, these pictures may border on cliches, but they are cliches that never fail to grab us. We're all suckers for that frame-filling drama of Ol' Sol looming large on the horizon.
And we all know how to get those shots of big suns - just shoot the horizon with that fabulously expensive, super-speed, extralow-dispersion glass, apochromatic tele, right?
Wrong. You need a long lens, sure, but it needn't be a budget buster. Some very good 500mm mirror lenses come in under $200, store price. There are all-glass 400mm, 500mm, and 600mm designs from major independents that sell for $300-500. And you can make an existing tele longer by using a teleconverter. That fine 300mm f/4 you bought for nature work, for example, can be converted to a 600mm f/8 with a 2X converter. That's a pretty good focal length for big suns. Using a 3X converter will make a 900mm f/12, and so on.
Besides a tele, you need a sturdy tripod - flimsy travel models need not apply. For one thing, focusing and framing through a long tele is far easier if the rig is well supported. For another thing, even a little shake can blur a long-tele shot.
A spot or limited-area meter helps, although it is not essential. An overall meter reading with an SLR will generally be far too high, resulting in a shot that's too dark - even if the desired effect is a silhouette. Most big-sun shooters use the strategy of spotmetering an area of the sky near but not immediately adjacent to the sun - an area in which some sky tone appears. This will give you a silhouette reading that will still maintain a little shadow detail.
And how do you focus and compose with that big burning disk staring you right in the eye? First, if everything in your frame is a long distance from the camera, setting the lens to infinity is the easiest way to focus without being dazzled. Otherwise, you may prefocuse the camera with the sun just out of the frame. You can often recompose the scene by holding your eye a little away from the finder to avoid being temporarily blinded by the sun.
The best big-sun shots are the ones that don't rely solely on the sun; the big sun, in fact, is best used as a background. The landscape, the harbor scene, the city skyline - each picture should stand on its own for it to work with a big sun behind it.
There is a pitfall here, though. Even with objects at a far distance, they can still be out of the plane of focus of the sun, due to the effective shallow depth of long lenses. Generally, the sun can stand to be a little soft, so try focusing on the nearest large object in the composition. Also, use small apertures and check the depth-of-field preview.
Big-sun shots can, on occasion, be surprisingly colorless; the sky around the sun can range from blank white to dull gray. A filter is called for here, from the standard warming (81A and similar) for a warm sky tone, to amber for richer color, to full orange for an exaggerated effect.
by: Jan Linden
There are many artists who struggle with drawing a face and having it actually look like the person you are drawing. These tips should help you to achieve a more realistic outcome and have your drawings come to life.
The first tip is probably the most important. When you are drawing, draw from a good source or reference. For instance make sure that your photo is a really high quality. Make sure that the photo is big and clear, and not a lot of different lighting sources. Choose a subject that is interesting to you. If you want, a good idea is to draw something of one of the masters, like Beugereau. If what you are drawing doesn't hold an interest for you, you won't do as good a job on it, you'll have less patience, lose interest and never finish. But again, make sure that your reference is high quality because if it's not, you'll end up with garbage.
Next, begin your drawing with your outline. Different artists use different methods for this. Also, time is a consideration, so whether you use a grid method or do it by eye, make sure you are accurate. Of course, the grid is going to be more accurate but time or environment may not allow for this method. Also, as you gain more experience you may go by the eye more often as well. Block in and remember that you don't want to add in the fine details yet. Don't get caught up in working on an eye and all of the lighting and shapes of the eye at this point. Avoid finer detail till later.
Then you can start to divide the light from the shadows, hitting the core shadow outline hard making a distinct value difference between light and shadow.
Then go over it with a towel or cotton balls. Never let your skin come in contact with the paper because your sin is made of oil and it will cause great ugliness to appear on your drawing! Instead use a piece of paper under your drawing hand to help you avoid this. Some artists use gloves made for drawing as well. Try and hit the shadow hard and then after you have gone over with a towel erase out some highlights and make the core shadow darker.
You can start darkening shadows make sure that you are using your referenc to figure out where these are exactly. You may have to do this several times till you establish the value you are after.
Not all of the shadows are going to be dark. Never forget where your light sources are coming from. This is extremely important. Look for where the shadows are falling in direct relation to where the light source is coming from.
Start adding the finer details to your drawing.
Blend in light spots and identify the highlights in your subjects hair. A very beginner mistake is to draw each and every strand of hair. Hair needs to be treated as a mass. Remember this and your hair will turn out more realistic than ever before.
Once you feel you are done, you are almost done. What? Well when you are working with graphite, it can be extremely messy and you may need to do some major clean up of smudges. Use a kneaded eraser to lift these.
Take your time with your drawings and you will begin to see that these techniques can be really beneficial. Anyone can learn to draw, it takes some patience and willingness.
by: Todd Harris
When digital cameras were first released on the market, everyone was excited. Finally, here was an easy way to take and store photos. No more would our closets be plagued with boxes and envelopes housing a hodgepodge of unorganized photographs. What we didn't realize was that soon, our computers would be filled with a hodgepodge of unorganized photographs.
The explosion of home computers and the Internet has led to an increased need for people to organize computer scrapbooks. It's easy to accumulate literally thousands of digital pictures, and it's just as easy to get them all mixed up. Try finding a favorite photo as you're scanning through a list of numbers and letters. Creating computer scrapbooks makes it quick and easy to locate the photographs, as soon as you want to see them.
When preparing your computer scrapbooks, the first step should always be renaming your photos. You should use file names that are easy to understand and organize, rather than keeping the default names set by your digital photography software. Anyone who has used a digital camera or camera phone knows just how hard it can be to decipher the file names, let alone selecting the photographs. Proper titles listed in computer scrapbooks make it easy to remember which pictures you have.
One key point to remember is that all of your computer scrapbook files will be sorted in alphabetical order. This can get confusing, particularly if you're naming pictures by date. Rather than call your photos 'January10', 'April21' etc, use the numerical format year, month and then day. Those same files will now be called 20050110Baby and 20050421Baby. In doing so, your computer will display them in the correct date order for you.
After your photo files have been renamed, you need to create folders to store the different types of photo files. Try organizing your computer scrapbooks by subject, theme or occasion. This will allow you to find your photos much easier later on. For example, create a folder called 'Baby Pictures' and save all of your baby photographs in that folder. By setting up and following a naming system, you'll soon have the most well organized computer scrapbooks around.
Whether or not you print your digital photos, always create backups of all your computer scrapbook files. There are many archiving programs that can be used to compress large files, enabling them to be stored on a CD or other removable disk. It is essential that you label your CDs to keep your computer scrapbook backups as organized as the originals. You can write the title on the CD itself, but you should also remember to alter the name of the CD as read by the computer. Most CD writing software automatically prompts you to give the CD a title, but check the instructions before you start the burning process so you, and your computer, will be able to clearly identify the CDs.
Digital cameras make it easy to take and save pictures. Computer scrapbooks make it easy to find the pictures anytime you're ready to take a trip down memory lane or share the digital images with your friends.
by: Barbara Miller
Introduction To Watercolor Painting Techniques
0 comments Published by blogster on Thursday, June 22, 2006 at 9:03 AMThis article will provide you with a general understanding of some of the more basic watercolor painting techniques.
Flat Wash Technique - The flat wash technique is one of the more basic and common of the various techniques. The flat wash technique is usually used when large areas of the canvas need to be covered. You will want to lay out the watercolor wash evenly and uniformly. First you will need to dampen the area of your canvas where you will be applying the watercolor wash. Make certain to have an adequate amount of water and pigment available before your start. If you should have to stop for any reason, it will be difficult to match your layers.. It is better to have more than less available. The angle at which you apply the watercolor wash is important. If the angle is too steep your wash will run down the paper. If the angle is too level, then you won't have enough movement. Use a large brush for this technique and start your first stroke at the top of the paper. Continue applying the watercolor wash going down the paper, but alternate sides as you move down.
Glazing Technique - The glazing technique is when you apply a thin transparent color over a completed dry layer of color. This technique creates some very interesting blends of new color. You will need to use a non-staining, transparent color for this watercolor technique. You should use a soft brush and don't apply that much pressure.
Wet In Wet Technique - Wet in wet is simply applying a wet wash over a wet surface. You start by evenly wetting the paper with a brush or spray bottle. Have a sponge handy to absorb any excess water. You want your paper to be evenly saturated. Then apply your watercolor.
Dry Brush Technique - With the dry brush technique, your paper is completely dry. You then apply a fairly dry pigment with very little water to the paper.
The dry brush technique should only be used where you want to draw focus or create texture in your painting. It's always a good idea to use various watercolor brush techniques in a single painting. This results in a more interesting painting.
Lifting Off Technique - Artists use this technique when they want to remove watercolor from a certain area of the panting. It is usually done by first wetting the area that needs to be removed with a clean sponge and then absorbing the color with a tissue. If you find that the color does not come off right away, then let the water soak in a bit longer and try again. If you still are unable to remove the color, then dampen a bristle brush and gently scrub the area. You should use extreme care with this watercolor technique, as there is a risk you can damage the paper.
I hope this article on watercolor techniques has helped. Happy Painting!
by: Ralph Serpe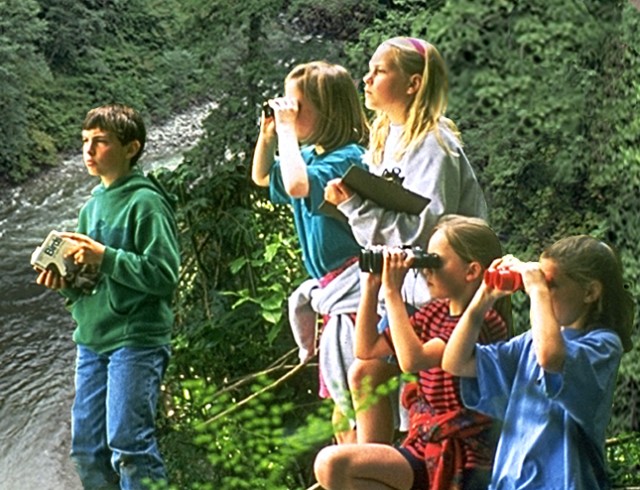 Bird watching or birding is a very popular hobby that includes the observation and study of birds.Because visual observation of birds is complemented with auditory observation, the term "birding" is more accurate.Birding is the second most popular outdoor activity in America, second only to gardening as the number-one recreation.
For many people bird watching is an opportunity to feel close to nature.They also enjoy the relaxation and peacefulness by watching birds.Some birders,however,will travel long distances just to see a rare bird.These birders are known as twitchers.Twitching is popular in Britain and several other European countries.
Most birders start out by watching and attracting birds to their own backyards.Bird feeding can benefit birds and also provide great bird watching.You can attract a variety of interesting birds to your yard by selecting and offering the right kinds of food. The common types of food offered in bird feeding are seeds,nectar,suet and fruit.Early morning is the best time for bird watching since many birds are then searching most actively for food.
Once you start feeding birds, you'll probably want to identify who is coming to visit.Equipment used for birding includes binoculars,a blank notebook, and one or more good field guides.
Field guides are books with pictures and descriptions of the birds.A field guide shows birds of just one country, or one region of a country, or one habitat.
Binoculars are described by two numbers: 8x32 for example.The first number tells you the magnification power of the binoculars.The second tells you the size of the objective lens at the end of the binoculars in millimeters.Most bird watchers think that 7 or 8 power is about right for most birding.
The next step is to broaden your birding experience beyond your own backyard.Plan a trip to a bird sanctuary, national park and other locations where you can see birds in large numbers.Wherever you go,never harm the birds and always respect other birders.
And don't forget to join a local birding club.Clubs organize field trips,show films of good bird watching destinations and some of them are involved in local environmental projects. Also visit your local library and check out books on birds and ornithology.
by: Albreht Moy Antique Lamps have become very collectible over the past few years. Certain styles such as Art Deco and Victoriana have assisted this popularity along with certain makers such as Tiffany that will never go out of fashion.
Some of the most collectible lamps are oil and kerosene lamps. They can still look as beautiful and stylish today as they did 100 years ago when they were first manufactured. There is something romantic about these lamps when they are lit and show off their glow to perfection in even the most uninspiring rooms.
Be very careful when purchasing lamps with glass shades. This is the place where most of the damage is done. Slight burn marks are normal and should be accepted with any lamp with an age. Run your fingers around the rim of the shade very carefully and check for hairline cracks.
Be also very careful when purchasing supposed Antique Lamps due to the number of reproductions on the market. Where a certain area is very popular as it is with Antique Lamps then it is just a matter of time before the market is flooded with reproduction pieces.
This does not mean that reproduction antique lamps are a bad thing. If you do have an original piece which has a slightly damaged shade it would be easy to replace this with a reproduction if it was for your own use and not for resale.
The only problems come when the reproduction lamps are passed on as originals either by unsuspecting sellers or by unscrupulous dealers. Check the lamps like you would any other antique. Look for normal wear and tear on the shade. Brass fittings would be worn away due to frequent use along with the base. Owners would often polish the lamps so this would also show on a genuine antique lamp. If you suspect anything regarding the lamps true age then don’t buy it.
by: Mark Fynn
 Kids and nature.
Kids seem to love most things that nature throws at them. And that includes little bugs running around the house and flying in the windows. When I was a kid I loved nature. And butterflies were part of that love. Along with my sisters and brother we caught caterpillars. Put them in a box to watch them hatch into butterflies. Our favorites were the Monarch butterflies as they were the most beautiful.
Back in those days, when I was a kid, we had to actually go out and look for caterpillars and butterflies, the pet shops never stocked them. Now the modern generation have it so easy, they can buy them on the internet and the postman delivers them.
None of this walking around the park looking for the trees the butterflies like so you can get the caterpillars. Also we had our butterflies in a shoebox with a few holes in the lid and sides to give them some air. Now you can buy a readymade butterfly enclosure like a big butterfly net that keeps your butterflies safe and sound.
The internet has changed life as we know it. But kids are still the same, they are still fascinated by what nature can do. And nothing is more fascinating that watching a caterpillar turn into a butterfly.
On the market there are two main butterfly habitats, both made by the same company “Insect Lore.”
The best habitat and also the most expensive is the “Butterfly Pavilion.” Here you order10 caterpillars and the company guarantees six to be perfect specimens. Most customers got all 10 alive through the post therefore ending up with 10 butterflies.
The pavilion is around 2 foot high so it is quite large and you can either hang it up or put it on a table or the floor. It is made from quite heavy see through cloth mesh. It is actually an amazingly simple design, wire support in a cylinder shape so it can either hang up or stand up, and it is complete with zippered entry so you can get in and out.
You also receive a very informative booklet that contains lots of butterfly facts. As well as instructions on how to put it all together and how to keep your caterpillars and butterflies alive.
First you buy the butterfly pavilion then you have to order the caterpillars. The caterpillars are pretty hardy so most survive the trip by US mail. They come in two cups complete with food.
Read the instructions before opening these cups. The caterpillars are supposed to stay in the cups so they can turn into chrysalides by hanging from the top of the cup.
Everything is supplied but you have to supply your own sugar water, which somehow manages to drip all over the place and cause a mess. But people being people they love to add food so most drop in apple slices or run around outside looking for leaves to feed the caterpillars which grow amazing fast.
After you receive the caterpillars they take about a week to grow big enough to pupate into chrysalis. Then the waiting game starts again while you wait for the butterflies to hatch. That takes about a week to 10 days.
You now have a pavilion full of butterflies. The instructions recommend you let them go free as long as the weather is over 55 degrees Fahrenheit. Because of this weather thing some people have kept their butterflies and have ended up with 2 or 3 generations in the one pavilion. So you can keep using the pavilion but you have to find your own food.
It is amazing what people can dream up nowadays. In my day were messing around with shoeboxes and it never occurred to anybody to make up a little butterfly cage like what you can buy nowadays. Nature has come a long way since I was a kid.
Insect Lore also bring out a smaller version called the Butterfly Garden which is about half the size of the Pavilion and comes with only six caterpillars. Everything else is basically the same right down to the instruction manual.
Nature will always fascinate children so it is these little educational toys that can make a difference in how we bring up our children and how much they will learn. As the cities have gotten bigger nature usually comes to us on the TV but these new generation nature toys are a welcome addition to our homes.
Article by copyright © Peter Legrove 2006, at www.animalsdinosaursandbugs.com
by: Peter Legrove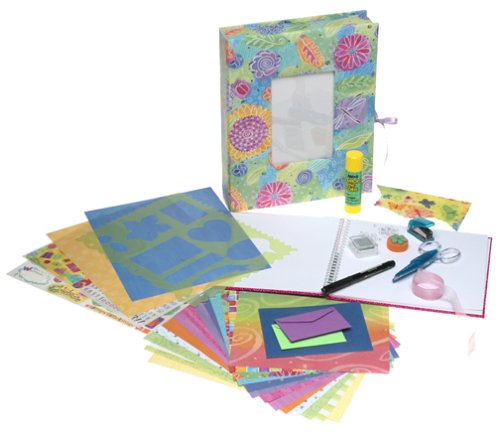 As a homeschooling mom of 4 girls, scrapbooking for kids has been on my mind alot lately. Let me back up a bit. My 4 year old was quietly playing one day with a roll of stickers. Afraid I was going to later find a bunch of stickers caught in the carpet, I asked her what she intended to do with them. She pondered for awhile and then said, "I am going to put them in a scrapbook. Mom, can I have my own scrapbook?" For some reason, this caught me by surprise, as I thought how wonderful of an experience this could be! So, I started thinking about it more and have come up with some tips and ideas to share with you on scrapbooking for kids.
First of all, I will admit, I am cheap! I wasn't sure how excited I would be at the thought of my 4 year old and her sisters cutting up my beautiful papers and glueing everything down in sight! I immediately thought of our local dollar store. They have albums that would be perfect for showcasing their creations in for the time being. The dollar store also offers scrapbooking supplies in the form of kits, stickers and embellishments. We have a reward system in place, where the girls can earn a trip to the dollar store to purchase their own scrapbooking supplies to do with as they please. This alleviates the desire to "mess" with my stash while instilling a sense of responsiblity to earn thier reward!
Here are a few more cost saving tips:
*Have too many pictures to scrap? Let the kids scrap the leftovers.
*When developing photos, get double prints. Let the kids scrap with the doubles.
*When you complete a project, put the leftovers and unused scraps in a container for them to use. They can create their own embellishments with the scraps. You will be amazed at what they can create!
One thing I do want to mention, when you scrap for the first time with your children, be prepared to help and guide them. Don't expect to get much done on your own pages until they start to get a feel for what they want to do and accomplish in their own scrapbooks. Now that they are ready to scrap, what should they scrap? Here are a few layout ideas:
*Have them scrap a page all about their favorite things at that particular age. (then repeat it for each year and see how their favorites have changed or stayed the same)
*Have your kids scrap about their favorite activities or sporting events they are involved in. I'm sure you have plenty of photos!
*Turn it into a learning experience and have them interview the subject of the photo. This would be great for older generations.
*If there aren't enough photos, have them draw pictures of people. Then watch how their drawings progress. Each one of my girls have a specific style of how they draw family members. It is interesting and fun to look at.
What about incorporating their artwork and creations? I am very blessed to get cards, pictures and artwork on an almost daily basis from my girls. But what do you do with all of them? Here are a few ideas:
*Hang on the refrigerator for all to see. Then once the fridge is full, take a picture of your child in front of their artwork and scrap the photo. You can also incorporate their artwork into the layout.
*Color copy and reduce the drawings/projects and use as photos in your layout or as embellishments.
*Are you near the end of a roll of film? Use up those last couple of shots of your child's artwork.
*Use pocket pages to "hold" your child's artwork.
*Create a "brag" book and give to grandparents or other family members as a special gift!
Even though I can be anal at times, I still want to incorporate my girls work into my scrapbooks as well. Afterall, they aren't really my scrapbooks but for all to enjoy! Here are a few ideas:
*Use child's drawings as a background paper.
*Use their creations as embellishments. You'll be amazed at what they can create with some paper, scissors and adhesive!
*Interview them. Ask them questions about the photo, layout, their mood. This would make for some awesome journaling!
I hope the above tips will give you some ideas on scrapbooking for kids!
by: Dawn Stegall Flower photography is one of the most popular forms of photography.You can photograph flowers growing in the wild, flowers that are cultivated in greenhouses and gardens, or photograph cut flowers and arrangements indoors,in a studio setting.
Both film and digital cameras work well for flower photography.
Any lens can be used in flower photography, from the ultra-wide angle lens (17mm),to the super-telephoto lens (300mm or 400mm),but if you are serious about closeup flower photography, buy a macro lens.
Most point-and-shoot digital cameras come with a built-in macro mode.Your digital camera's macro feature lets you get very close to your subject,and that is important when photographing flowers.
A tripod is essential because it reduces the chance that you'll get a blurry image.Many tripods, even when fully collapsed, are too high for photographing low growing flowers.That is why you need to get a tripod that allows you to get close to the ground. A special kind of tripod, called a tabletop tripod, is great for photographing small flowers and other objects.
Use a color-saturated type film. A film with an ISO 50 or ISO 100 will give you bright colors. Don't use film faster than ISO 400 for flower photography.
The ideal lighting for photographing flowers is the soft, diffused light of open shade or a cloudy day.Night photography is also an option.A flower photo can be very attractive when illuminated by flash.Wind is the most annoying factor when photographing flowers,so be patient and wait for the wind to die down before you take a picture.
Whether you're photographing flowers indoors or outdoors,consider unusual angles.Try photographing your flowers in early morning light and photograph them again in late afternoon light.Use warming filters to create mood. Add water droplets to the petal of your flower and give it that dewy,morning look.Experiment with backlighting and try to highlight the transparency of the petals.
Don't forget that, although most people love color photography, creative flower photography can be in monochrome as well.
The only way of developing successful techniques in flower photography is to practice, and also learn more about flowers.Botanical gardens and nature preserves are some of the places where you can not only take photos of flowers but also learn more about them.
by: Albreht MoyChallenge Coin Display Cases And Challenge Coins Tips
0 comments Published by blogster on Saturday, June 17, 2006 at 3:28 AM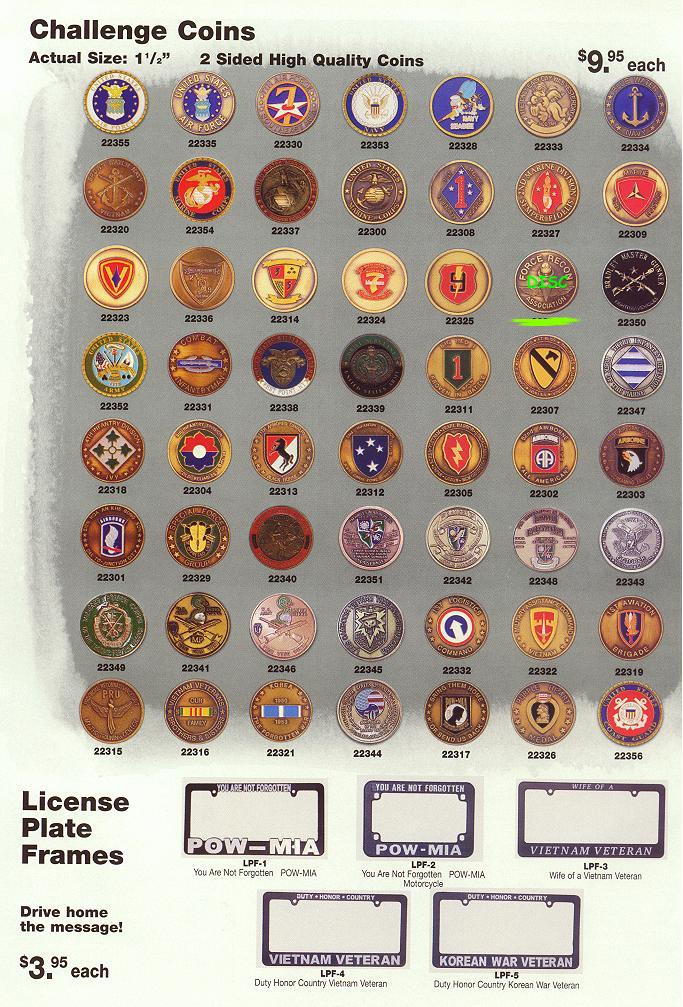 I find it amazing that the interest and popularity of challenge coins and challenge coin displays keeps rising. I get many questions about military challenge coins so I have decided to gather some valuable tips for you.
The most popular challenge coins are navy challenge coins, marine corps challenge coins, army challenge coins, air force challenge coins and police challenge coins. Which one do you prefer?
Challenge coins are more precious than one can imagine – they usually worth a couple of bucks, but they have a sentimental value no one can evaluate. That’s way; you must protect your military challenge coins by using a challenge coin display case.
Buy a challenge coin display that totally answers your needs:
1. One that will make you proud of your challenge coins collection – Some have dozens of challenge coins from navy challenge coin, marine corps challenge coins and army challenge coin to air force challenge coins and police challenge coins. A collection like this could be really impressive.
2. One that will fully protect your challenge coins – Most of the challenge coin display cases have a plastic capsule for each individual coin.
I find the military challenge coins a bit magical. Did you know that no one can point exactly when the first challenge coin was made? Some say that the first one is date to World War 1. Others say that the first military challenge coin is from the Vietnam War.
I believe that people are just starting now to understand the real value of challenge coins. A good investment would be purchasing as many different challenge coins as you can. They are going to be an expensive collectible item in a few years.
But one should remember that a challenge coin represents values before everything – support to the organization minted on the coin whether it is a navy challenge coin, marine corps challenge coin or any other organization.
by: John DellFree Art Instruction - Portrait Painting Tips & Techniques
0 comments Published by blogster on at 3:25 AM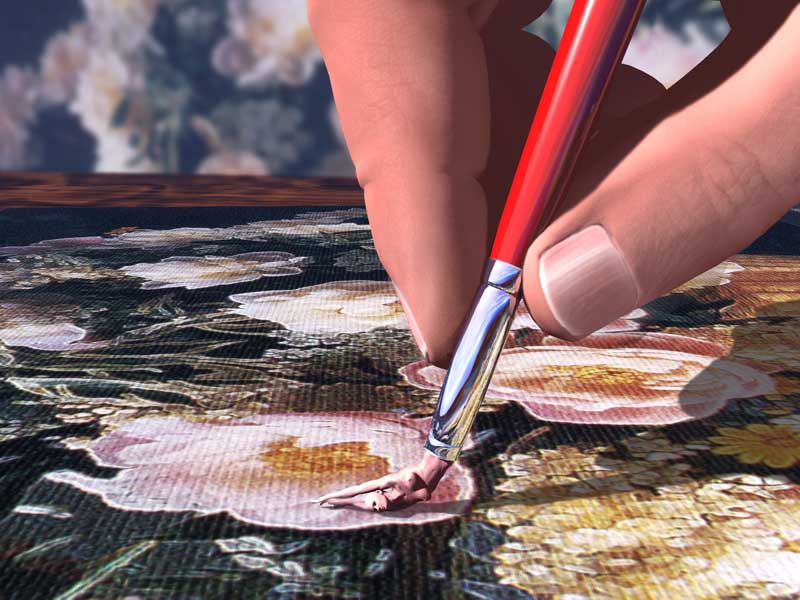 Being able to capture the likeness of a human being on canvas, using paint, is certainly a sought after accomplishment for many new painters. It can also be somewhat challenging. This article will cover some of the more basic portrait painting tips & techniques and help lessen some of the confusion many beginners face. With practice, you will soon be painting portraits like the masters.
If at all possible, I highly recommend you paint your portraits using a live model as opposed to a photograph. There is simply no substitution for painting from life.
Painting a successful portrait is all about how you observe the subject. You want to study the subject as a whole. Study the bone structure and try to see shapes and planes. Do not try and paint every little detail exactly as you see it.
For beginners, it is probably best to start out with a lighting effect where light and shadow are in high contrast. This will make for a much easier painting.
Focus on one section at a time. Finish each section before moving on to the next.
Keep the darks of your portrait at a thin consistency while your lights should be painted on thickly.
Many beginners struggle with mixing flesh tones. I know I did when I first started painting. Remember that skin comes in a variety of colors & textures, so there is no specific formula for mixing flesh tones in portrait painting. You will have to experiment and practice, until you find the right color mixtures for any particular subject. Never purchase any pre-mixed flesh colors. When mixing your colors be careful not to over mix, which can deaden a color.
Try and repeat the colors and values in your painting to create balance.
When painting hair, don't try and paint every individual strand of hair. Look at the hair as one object and then paint the lights and darks. Paint the hair in the direction of the shape of the head.
The muzzle area of the face (the space between the nose and mouth) is generally the same color as the flesh but cooler.
When painting backgrounds, don't make them too detailed or busy. If you do, you will draw focus away from your portrait.
Add bits of color where the shadow meets the light in your portraits.
Fleshier parts of the face are generally warm and bonier parts of the face, like the chin for instance, are generally cool in color.
The white in the eye is not white. To get an accurate color for the white in the eye you can take the subjects basic flesh color and then lighten it with a gray made from black and white.
I hope these portrait painting tips & techniques have helped. Portrait painting can be difficult, possibly even frustrating in the beginning. Never give up and keep practicing. You will get the hang of it.
by: Ralph Serpe "Any good photography is a successful synthesis of technique and art.” - Andreas Feininger
This article will attempt to help you come to a clearer understanding of the photography schools and colleges available, what they can offer you in terms of photo and arts education, and guide you towards investigating more about specific schools and where you can find out more information.
Photography SchoolsPhotography is a wonderful choice when it comes to a career. Photography is a versatile path that allows you to specify within the degree, and move from different types of photography within your lifetime. From magazine covers to exotic locations to local newspapers, a career in photography will allow you to pick and choose exactly what you want to photograph. However, a career in photography doesn't happen with well wishes and hopes...you have to work to get there! So where do you begin in your search for photography schools? Right here!
You'll have to learn about the photography business, learn how to deal with copyright issues and information, manage your photo porfolio and how to work with others in the field. There are many courses in the field of photography taught at many of the schools, teaching you in a variety of areas including:
* Photographic equipment
* Photographic processes
* Photograph techniques
* Color theory
* Special skills
* Digital imaging and photo processing
There are many many more fields available when it comes to your career path in photography, the above were simply some examples.
If you're passionate about photography and want to pursue this versatile career, it's important that you take the time to learn from experienced professionals that can guide you in your efforts to pursue professional photography, motion picture and video photography, visual journalism, and thinks like visual communications. What's great about attending photography schools nationwide is that you dont' have to begin an expert, you begin a beginner! Many of you are pursuing this field because you have a natural eye for photography, and that's great - but maybe you're just developing one. That's great too! What you probably didn't know is that photography school will teach you much more than simply how to snap a few brief pictures and dip em in developer. They teach you the scientific processes of film, chemistry, optics, color theory, lighting rations, and digital and computer skills.
You'll also find collegues and students at your school that share your passion, talents, and skill and want to join in mutual efforts to further your careers. Here are a few photography school frequently asked questions that might help you!
* What is the objective of many photography schools?
* What types of photography might I choose to go into?
* What type of school should I look for?
* What are some of the top schools in the US?
What is the objective of many photography schools?
The objective (or the objective I believe is crucial to selecting a school) of many is to develop photographers that are technically and professionally sound, enabling them to pursue any photographic field and compete in the job marketplace.
What types of photography might I choose to go into?
There are many different types of photography fields, including fasion photography, digital photography, advertising photography, editorial photography, documentary style, wedding photography, portrait photography, or photo technician style work. You'll be prepared to do any of these with a solid education at a photo college or school.
What type of school should I look for?
My recommendation is a school that teaches nothing but photography! Obviously affordability is important, but a photo only institute is a great way to go!
What are some of the top schools in the US?
There are several wonderful photography schools, but some of ones we'll choose to highlight are Brooks Institute of Photography and the Art Institute of Colorado. For a more detailed list of Photography schools and information, please click here or continue browsing this article.
Brooks is a world leader when it comes to visual arts and photographic education. You'll want to find a photography school that helps to meet career oriented needs that you establish before you search. You'll want one with experience in the field for a long period of time, not just a hokey internet college.
You want want that can offer you a chance to broaden your resume through internships and opportunities. The joy of this career is that you get to turn your photographic ambition into something that pays the bills and you love to do every single day! Who wouldn't want that! I hope this article has proved even a little helpful, and that you'll consider going into the wonderful field of photography!
by: Andrew Holloway
 If you are interested in making rubber stamps and have investigated other rubber stamp making methods you should seriously consider polymer stamp production as a serious option.
What are Polymers?
Tiny molecules strung in long repeating chains form polymers. Why the chemistry lesson? Well for one thing, your body is made of them. DNA - the genetic blueprint that defines people and other living things - is a polymer. Proteins and starches in the foods we eat, the wheels on our skateboards, and even the tyres on our bikes and cars are polymers. In fact, we are surrounded by polymers every day, everywhere we go. Polymers also form one of our recyclables, which is good for the environment.
Polymer Curing - How stamps are made with chemistry!
In polymer chemistry and process engineering, curing refers to the toughening or hardening of a polymer material by the cross-linking of polymer chains; this is brought about by chemical additives, ultraviolet radiation or heat. Rubber stamp polymer is supplied as a liquid and is cured using ultraviolet radiation. Although natural sunlight can cure polymer, liquid stamp polymer requires precise exposure to UV light to make rubber stamps.
Polymer Stamps - Make your own stamps without any skills whatsoever!
How many times has this been said in the past! Polymer stamp production has always attracted people trying to make a quick dollar out of the process. We have seen salespeople selling briefcase size polymer stamp machines to the unsuspecting stationery store and newsagent owner plus more recently the DIY kits sold over the internet aimed at craft people. If you are serious about stamp production you should be wary of some of the claims made about stamp making using liquid polymer.
Polymer in a bag
The most exciting development of recent is a new innovation where polymer is injected into a flat rectangular sealed bag; this new product does away with backing sheets, foam tape and coverlay film normally required for stamp production. Processing times are reduced by about 50% when using these new bags; this reduced labour cost negates the extra cost of the bagged product. The bags are available in a range of sizes to suit production demand. Polymer in a bag has also eliminated the problem of air bubbles during processing; this common objection to polymer stamp making has now been overcome.
Where the Polymer Rubber Stamp Industry is Heading
You have two distinct markets for rubber stamps. The first is the traditional business stamp market where stamps are affixed to handles and self inking units. The second market that is growing rapidly is the craft industry; these stamps are affixed to wooden or clear acrylic blocks and used for card making and scrapbooking. Craft stamps such as an artist's range of stamps that follow a theme are traditionally made using the vulcanizing process due to it being more suited to mass production of the same stamp. Nowadays card makers want custom designs and clear see through stamps of which polymer is making some significant inroads into this market.
Another problem has arisen where polymer 'jelly' stamps are being sold to the craft industry, these polymer stamps have no structural backing allowing the polymer stamp to adhere to an acrylic block without adhesives. In theory this works well, the problem is that distortion of the stamp can occur as well as the possibility that the stamp can tear.
Thankfully a new clear silicone based product called InstaGrip has solved this problem so a polymer stamp with a sound structural backing can be adhered in the same way, without adhesive.
So where is the industry heading?
Business stamping seems to be just as strong as it always has been, with the introduction of the bagged polymer many more manufacturers will be offering polymer stamps due to the bag's labour saving benefits and the lower entry cost for polymer processing equipment.
The craft stamp industry will see much more polymer in the future for much the same reasons. The demand for custom made stamps through services such as www.stampsearch.com.au here you select craft artwork online and then have that image made into a stamp will help the polymer stamp industry develop in a positive manner.
by: Robert de Rooy
![]() The word Lego is taken from the Dutch for “play well”, which is leg godt. The word is now synonymous the whole world over for a toy which everyone loves to play with be they old, young, boy or girl. We are so used to making things from Lego that rarely do we stop to think about how each individual block of Lego itself is constructed.
The word Lego is taken from the Dutch for “play well”, which is leg godt. The word is now synonymous the whole world over for a toy which everyone loves to play with be they old, young, boy or girl. We are so used to making things from Lego that rarely do we stop to think about how each individual block of Lego itself is constructed.
Firstly, granules are loaded from large trucks into the granule silos. After this the granules are taken to molding machines. These subject the granules to high temperatures, melting them into a highly viscous substance. This substance is then poured into molds of various sizes to make the bricks that we all know and recognise. Once the molten granules have been poured into the molds they are transported to the decorating and printing stage. Although the color of the brick is determined by the color of the granules in the first stage of the process, the bricks can have patterns printed on to them, or designs. For example, bricks with words on such as taxi or police have them printed on at this stage in the manufacturing process. Once this is complete, the Lego bricks are taken to the packaging area where they are placed into boxes with other Lego pieces ready to be shipped to stores or to wherever they are required.
Lego also have additional branches which are aimed at different users. For example, Duplo is made by Lego but is widely known by the name Duplo and not always associated with Lego. Individual Duplo pieces are much larger than those of a traditional Lego set and they are aimed at a much younger clientele. Children aged 2-6 find Duplo much easier to get hold of because of its increased proportions and so encourage younger children to exercise their creative minds.
Technic Lego is more advanced than standard Lego and so appeals more to the 10-15 year old market. This often incorporates very small pieces as these kits have moving components. For example, you can make such items as a helicopter with propellers which actually move when you turn a handle.
For some time Lego was aimed primarily at boys with kits based on Star Wars or Batman. This balance has now been redressed somewhat and it is now possible to purchase kits to build Disney Princess Castles and such like. Lego is a great toy for children as it helps to improve their hand eye co-ordination as well as their imagination and so children of both sexes should be encouraged to play with it in preference to watching endless hours of TV.
by: Susan Green